Dockerize a React app from Scratch


Table of contents


No headings in the article.
(this is my first blog suggestions are highly appreciated).

In this article we dockerize a react app and run it inside a container.
Steps involved:
- Creating a React app
- Build an image from the react file
- Containerize the app we build
First we create a react app by using the command in terminal npx create-react-app my-app check it is working by using commands cd my-app and npm start.
 u can see this in local host (port number).
Now create a Dockerfile in my-app folder Dockerfile has no extenision

The
FROMinstruction initializes a new build stage and sets the Base Image for subsequent instructions. As such, a valid Dockerfile must start with a FROM instruction. The image can be any valid image – it is especially easy to start by pulling an image from the Public Repositories.The
ENVinstruction sets the environment variable to the value . This value will be in the environment for all subsequent instructions in the build stage and can be replaced inline in many as well. The value will be interpreted for other environment variables, so quote characters will be removed if they are not escaped. Like command line parsing, quotes and backslashes can be used to include spaces within values.
- The
WORKDIRinstruction sets the working directory for any RUN, CMD, ENTRYPOINT, COPY and ADD instructions that follow it in the Dockerfile.
- The
COPYinstruction copies new files or directories from and adds them to the filesystem of the container at the path .
- The
RUNinstruction will execute any commands in a new layer on top of the current image and commit the results. The resulting committed image will be used for the next step in the Dockerfile.
The
EXPOSEinstruction is used to expose port of the container for communication with the container.The main purpose of a
CMDis to provide defaults for an executing container.
Done with Dockerfile now build an image out of it using the docker build --tag react . command we can build docker image --tag to give the name for image . specifies file location we can use . if we are in the same location as the file.
after the image is built check it by using the
 docker command
 docker images
or u can see it in the docker desktop app.

Now we write the docker-compose file
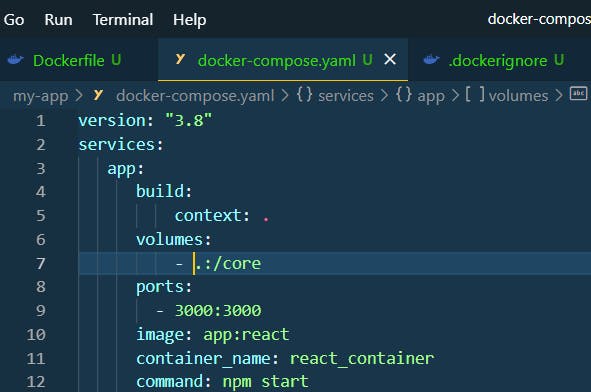
Check this link for more information on how to write docker-compose file this.
Now use docker-compose up

and check running containers using Docker ps
Now u can access in port 3000 of your host.